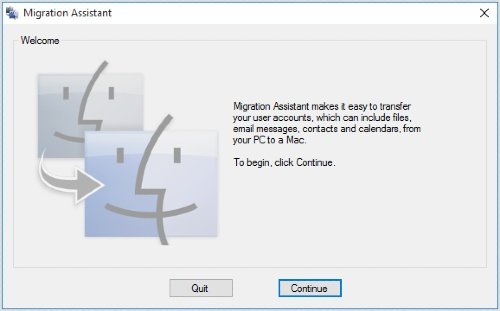
Apple’s Windows Migration Assistant software is now compatible with macOS Big Sur. The company just updated its Windows migration tool with much-awaited support for the current major release of macOS. As a result, Apple’s Windows Migration Assistant version 2.3.0.0 now provides users with an option to migrate their data from a Windows computer to the latest Mac operating system.

Windows Migration Assistant for macOS Big Sur
You can transfer your data such as contacts, calendars, email accounts, and more from a Windows computer (Windows 7 and later) and migrate the data to the appropriate macOS directories. Once the data migration is complete, you need to authorize your Mac for iTunes Store purchases.
Apple announced macOS Big Sur at its Worldwide Developers Conference (WWDC) on June 22, 2020. The company made it available publicly on November 12, 2020.
The successor to macOS Catalina, macOS Big Sur brings a significant user interface redesign. It is also the first macOS version to support ARM-based processors.
Step 1: Before Migrating from macOS Big Sur to Windows 10
- Ensure that Windows is up to date.
- Ensure that you know the administrator account credentials on your PC.
- Connect your Mac and PC to the Wi-Fi network or connect your Mac and PC ethernet port.
Step 2: Use the check disk (chkdsk) utility
- Run Command Prompt.
- Type chkdsk and press Enter.
- At the prompt, type Y, then restart your PC.
Step 3: Move data from a Windows PC to your Mac
- Download Windows Migration Assistant for macOS Big Sur on Windows 10.
- Quit any open Windows apps.
- Open Windows Migration Assistant > Click ‘Continue.’
- Start up your Mac.
- Open Windows Migration Assistant.
- On your Mac, follow the onscreen prompts.
- Select the option to migrate data “From a Windows PC.”
- Click ‘Continue.’
- Enter an administrator name and password.
- Click Continue to close any other open apps.
- Select your PC from the list of available computers.
- Click Continue on your PC and Mac when both computers display the same passcode.
- Your Mac scans the drives on your PC to build a list of information to migrate.
When migration completes, log in to the new user account on your Mac.
Leave a Reply